


1
2
3
4
5
6
7
8
9
10
11
12
13
14
15
16
17
18
Hole 1 - Par 4 419 Yards
The opening hole is a medium length slight dogleg to the left. The water on the left side of the hole is not very much in play, so that golfers can get away easily. A good drive to the right center of the fairway should leave a mostly open approach shot to a relatively simple green.
Hole 2 - Par 4 381 Yards
The second hole takes full advantage of the largest grove of pre-existing trees on the site to create a unique short dogleg to the right. The tee shot must be carefully placed to avoid the large cross bunkers and gain access to the tightly guarded green, one of the smallest on the course. This is a deceptively difficult hole that will result in many unexpected bogeys.
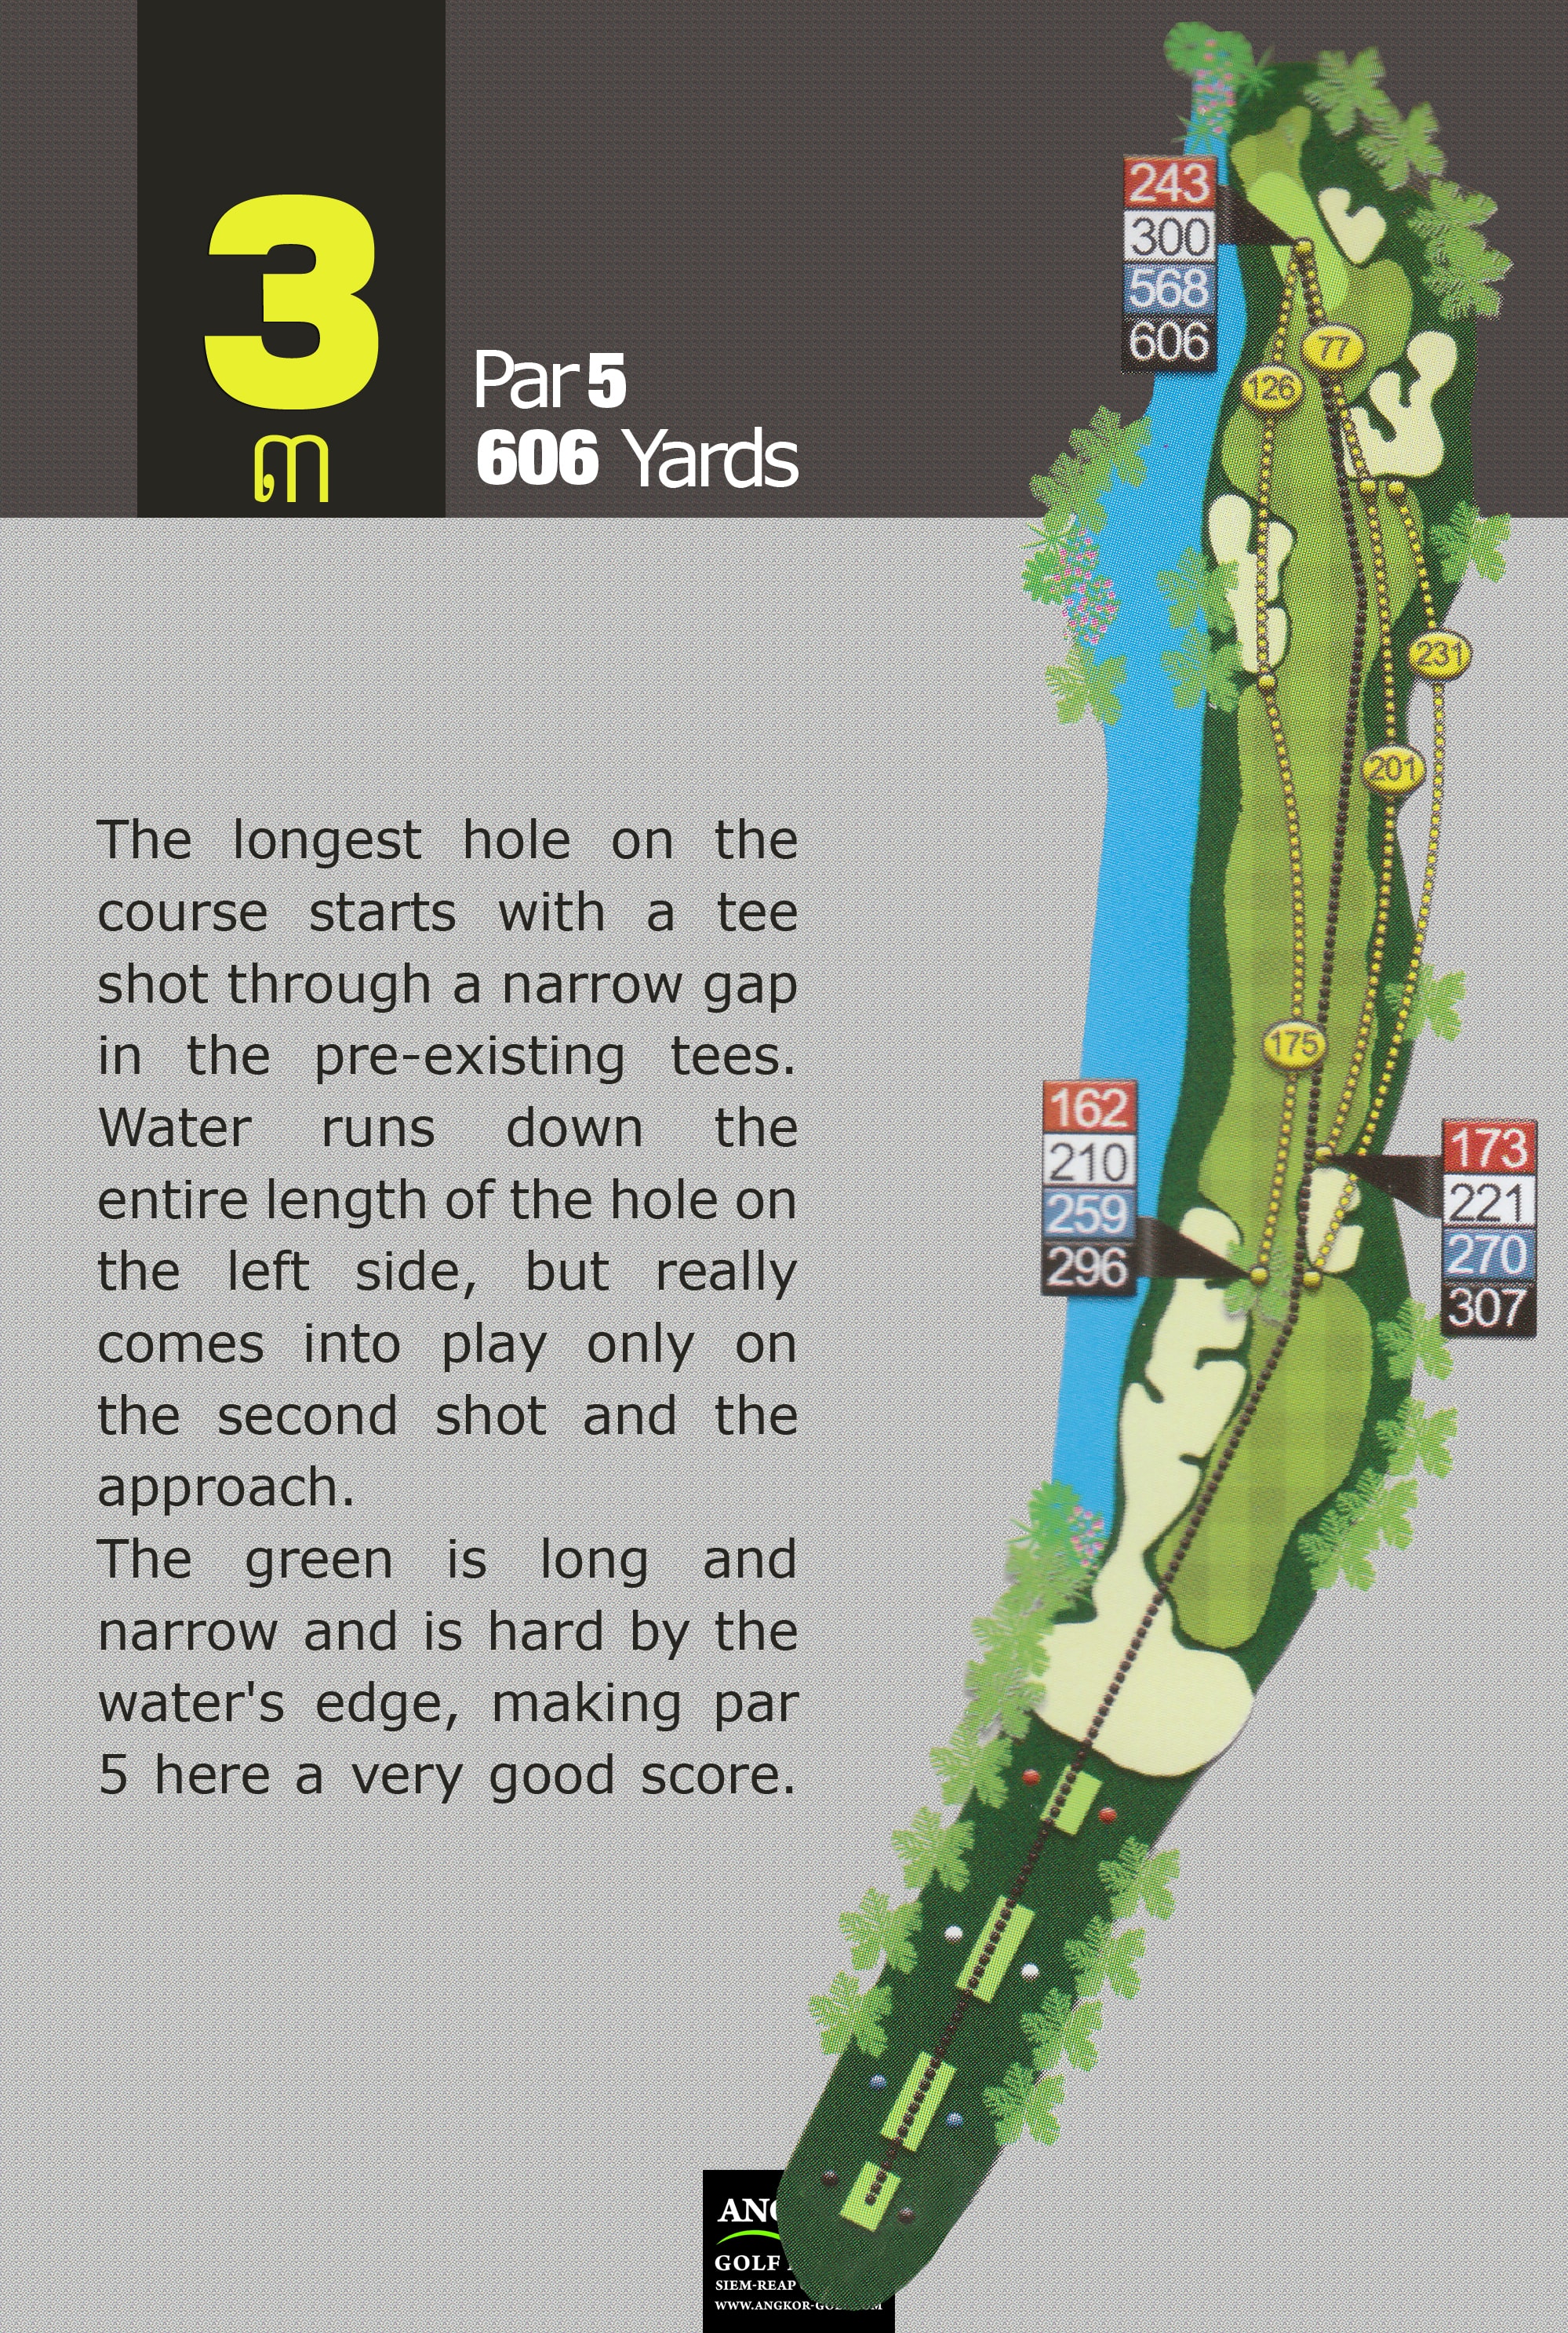
Hole 3 - Par 5 606 Yards
The longest hole on the course starts with a tee shot through a narrow gap in the pre-existing tees. Water runs down the entire length of the hole on the left side, but really comes into play only on the second shot and the approach. The green is long and narrow and is hard by the water's edge, making par 5 here a very good score.
Hole 4 - Par 3 183 Yards
The first par three on the course is medium length and tightly bunkered in front and behind. A narrow opening at the front of the green will allow some run-up shots to the middle of the green, but the best approach when the pin is on either the left or right of this heart shaped green will be a lofted shot.
Hole 5 - Par 4 343 Yards
Another short but dangerous par 4, this hole has water in play down the entire right side. The fairway bends slight to the right at the landing area and drive may not be the proper play from the tee if the fairway bunkers are to be avoided. The ware guards the green closely on the right while a pair of bunkers guards the left side.
Hole 6 - Par 5 561 Yards
The second par 5 on the course is reachable in two shots for long hitters, but two deep bunkers beyond the turning point and water on the left side makes this a very strategic second shot for those challenging the green. A large bunker guards the right front of the green, giving this pretty straight hold a distinctive S-Shape and causing all golfers to stop and think before they hit.
Hole 7 - Par 4 480 Yards
This monster of a par 4 turns slightly to the right to the green that is closely guarded by one of the few pre-existing trees on this part of the course. Most golfers will want to treat this hole with a lot of respect and may want to play for a safe 5 rather than get to aggressive and end up with a 6 or higher. Par 4's will be rare here, especially when the wind blows from the north.
Hole 8 - Par 4 430 Yards
This medium length par 4 begins on an island tee ( at least for the back tee). Water runs down the entire right side of the hole but is generally pretty far from the centerline of the hole. There is plenty of room for the tee shot, only really long hitters will have to work the ball between the big bunker on the right side and the pair of smaller bunkers on the left side of the hole. A modest drive just short of that pair of bunkers will leave a middle iron to a closely bunkered green.
Hole 9 - Par 3 218 Yards
The front nine ends with a fairly long par three over some wetlands to a carefully bunkered green. The green sits left to right, making a fade the preferred shot shape here, and a large run-off area at the back of the green will get plenty of action.
Hole 10 - Par 4 445 Yards
The back nine opens with a long par 4 that doglegs sharply to the left. The water that runs down the left side of the tee shot crosses the fairway well beyond the turning point and makes its way over to guard the 17th green. The green at #10 run back to the right, making the positioning of the tee shot very important. The best tee shot will challenge the bunkers on the left side of the fairway to open up the entrance to the green. A difficult par.
Hole 11 - Par 4 353 Yards
The 11th is a classic risk reward hole. The yardage measured along the dogleg centerline defines the safer route, but long hitters will be tempted to try for the green with the tee shot. From the back tees the carry over water straight at the green is 283 yards, and it lessens as one moves up to the shorter tees. The long green is guarded on the left by water and on the right by a deep bunker, putting a premium on accuracy. Even golfers taking the safe route will have to place their tee shots carefully if they want an open approach to the green.
Hole 12 - Par 3 182 Yards
The shortest hole on the course is not the easiest. The green is well protected by water on the left and front and by bunkers on the right and long. Careful club selection and deft execution are called for here.
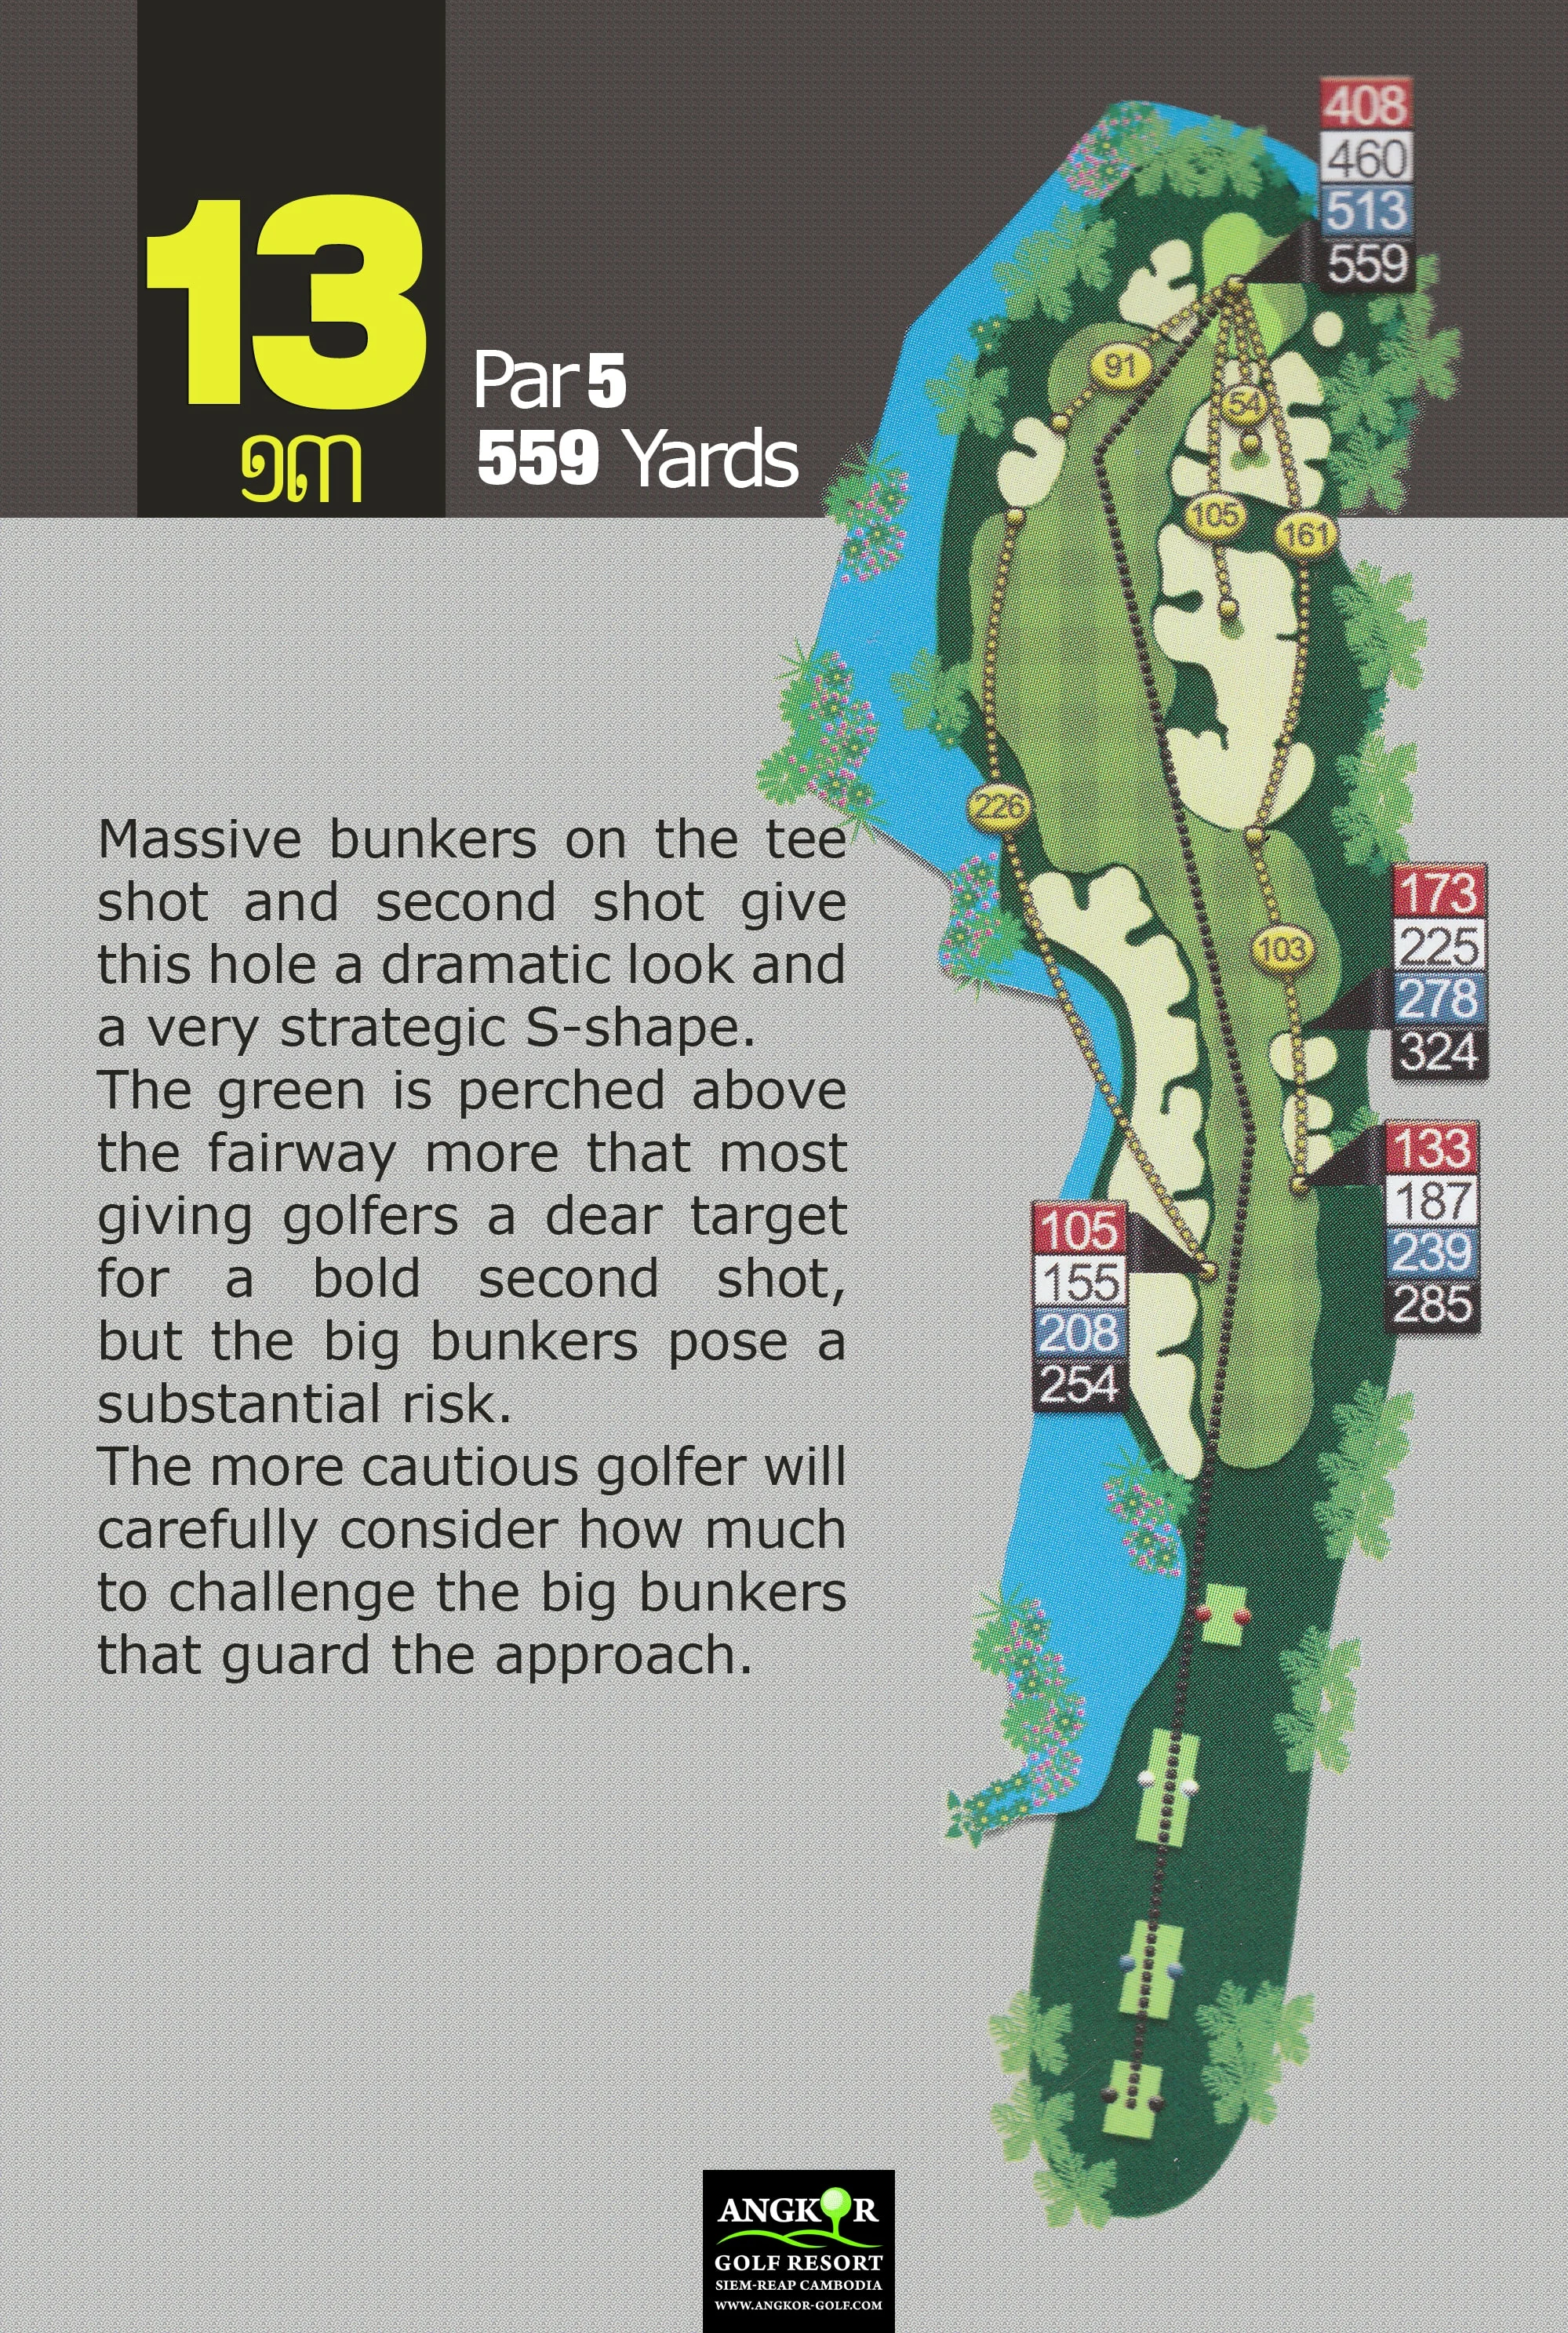
Hole 13 - Par 5 559 Yards
Massive bunkers on the tee shot and second shot give this hole a dramatic look and a very strategic S-shape. The green is perched above the fairway more that most giving golfers a dear target for a bold second shot, but the big bunkers pose a substantial risk. The more cautious golfer will carefully consider how much to challenge the big bunkers that guard the approach.
Hole 14 - Par 4 455 Yards
This is another very long par 4 with a demanding approach. Many golfers will do well to lay up their second shots short of the pinched fairway, with water on the left and bunkers on the right. Four is a very good score here.
Hole 15 - Par 4 426 Yards
The 15th heads for home as a medium length dogleg left with a narrowing fairway for the longer hitters. Water is on the left off the tee and crosses the fairway to guard the right side of the green. The strategy here is clear: challenge the water off the tee to open up the best angle to the pin especially if it is tucked behind the bunker at the front right side of the green.
Hole 16 - Par 5 503 Yards
The final par 5 on the course is probably not reachable in two shots except for very long hitters. The angle of the green together with the water on the left of the hole, however, poses a real challenge for those wishing to get their approach shots close. A cautious lay up, away from the water, on the second shot will leave a very demanding pitch over a deep bunker to a pretty shallow green.
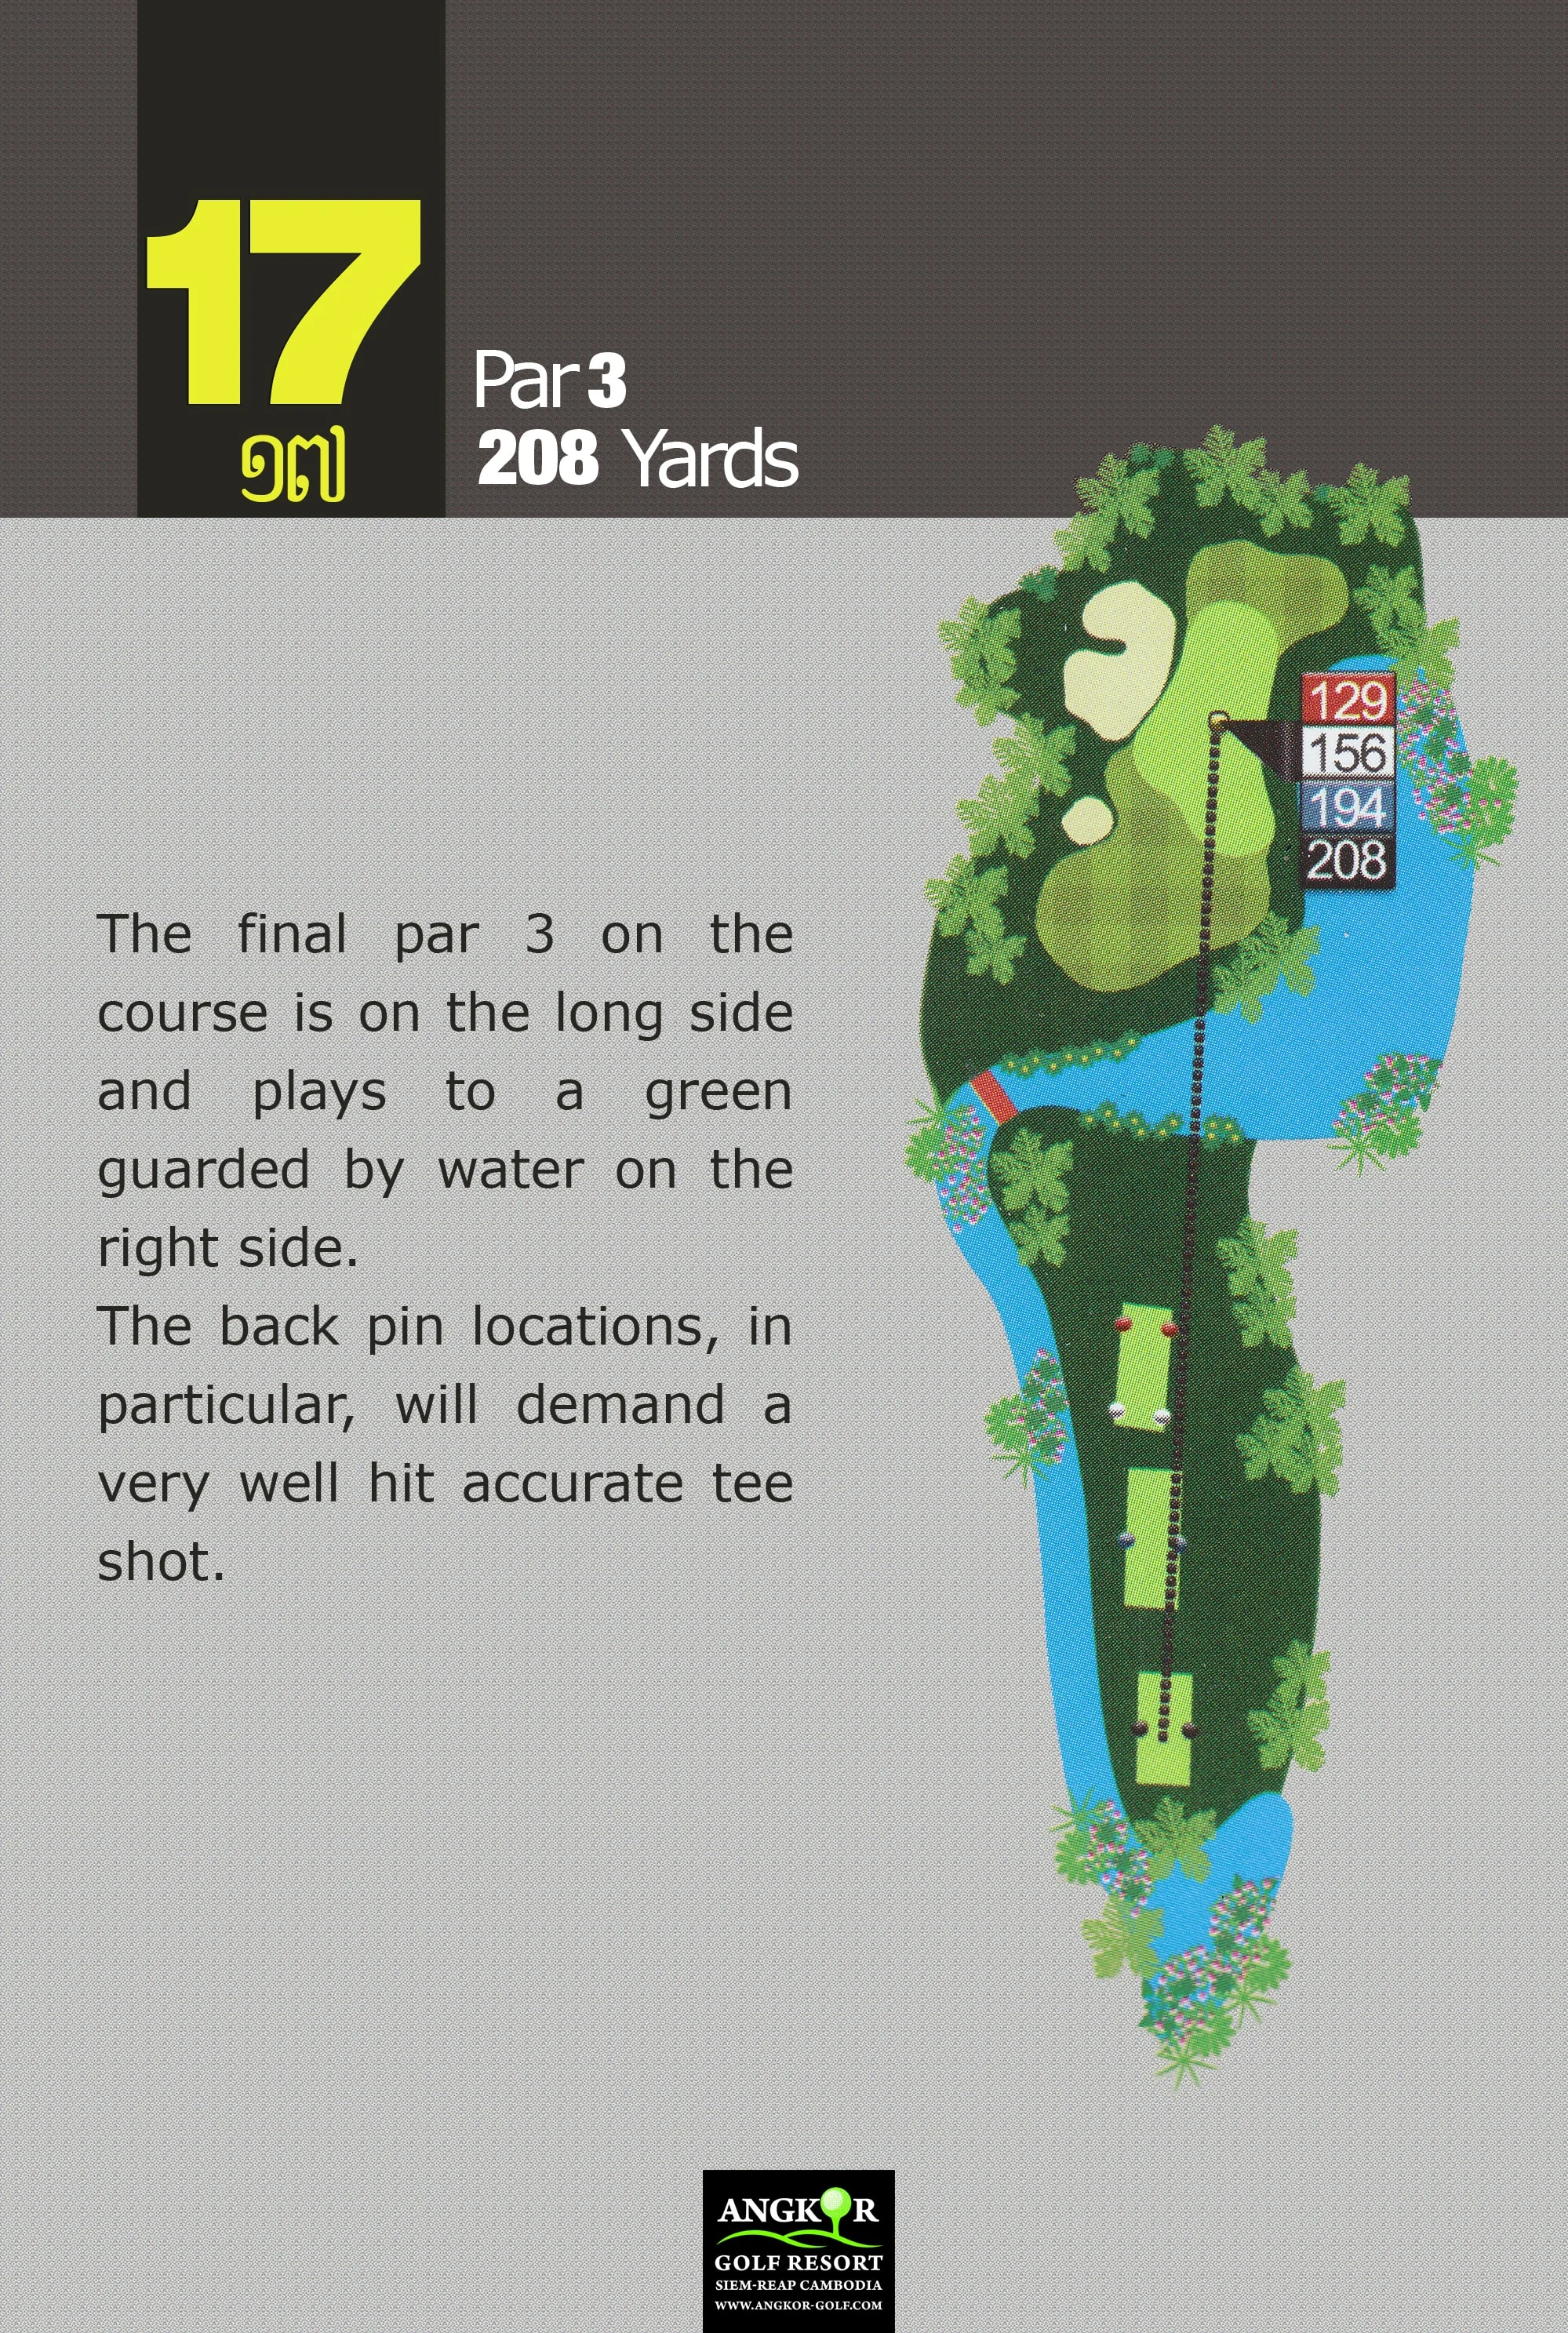
Hole 17 - Par 3 208 Yards
The final par 3 on the course is on the long side and plays to a green guarded by water on the right side. The back pin locations, in particular, will demand a very well hit accurate tee shot.
Hole 18 - Par 4 437 Yards
The golf course closes with a long hole that bends slightly to the left. Water runs down the left side affecting both the tee shot and the approach. The best tee shot must challenge the water on the left to open up the approach into the green. A difficult closing hole is a Faldo trademark.


We would like to inform you that Angkor Golf Resort will be temporarily closed from 1st June 2026 to allow for renovation works and a period of restructure.
This decision comes as part of our commitment to ensuring the long-term sustainability and quality of AGR.
We truly appreciate your loyalty and understanding, and we look forward to welcoming you back in the future.
Further updates regarding reopening timelines will be shared in due course.
For enquiries please contact: Hendra@angkor-golf.com